

Complete Guide to AWS Cognito Integration with Java: Secure OAuth 2.0 PKCE Authentication
AWS Cognito Integration with Java-Based Applications
This document provides a step-by-step guide to integrating AWS Cognito with a Java-based application using the OAuth 2.0 Authorization Code Flow with PKCE. It includes detailed explanations, example code, sample responses, and best practices to ensure a secure and seamless authentication experience.
Overview
AWS Cognito simplifies user authentication and authorization by offloading the complexity of managing secure user login to a cloud-based identity provider. This guide demonstrates how to integrate AWS Cognito into a Java-based application using the OAuth 2.0 Authorization Code Grant with PKCE. This method ensures:
- Secure communication between your application and Cognito.
- Compliance with industry-standard authentication practices.
Prerequisites
AWS Cognito Setup
-
Create a User Pool:
- Go to the AWS Cognito Console and create a user pool.
- Configure attributes such as username and email.
-
Create an App Client:
- Enable Authorization Code Grant and PKCE for your app client.
- Note down the Client ID and Domain for later use.
-
Configure Redirect URI:
- Set
http://localhost:8080/callbackas the redirect URI in Cognito (replace with your app's URI in production).
- Set
Java Application Setup
-
Dependencies:
- Add libraries for HTTP requests (
Apache HttpClient), JWT parsing (auth0), and JSON handling (Jackson).
- Add libraries for HTTP requests (
-
Environment Variables:
- Store sensitive values like the Cognito domain and client ID as environment variables.
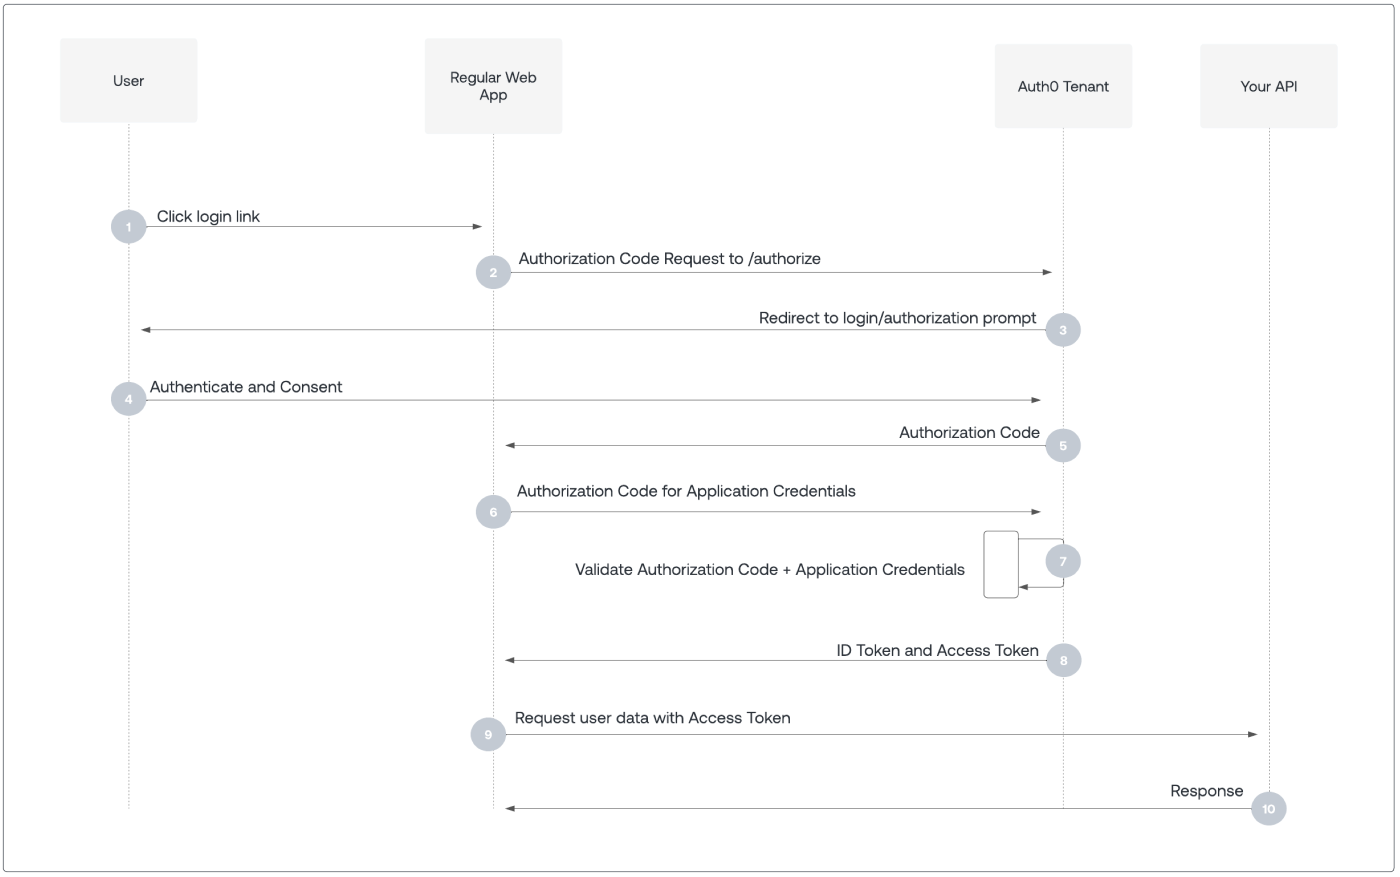
Overview Diagram
This image is used from the Authorization Code Flow Documentation from Auth0.
Step-by-Step Integration
1. Initiating the Login Flow
The login flow begins when a user clicks the "Login" button. The application generates a PKCE code challenge, constructs the login URL, and redirects the user to AWS Cognito's hosted UI.
Key Steps:
-
Generate a
code_challengeand Store thecode_verifier:- Use the
PKCEUtilclass to generate a randomcode_verifierand its hashedcode_challenge. - Store the
code_verifierin the session, as it will be needed later during the token exchange.
View details on how the
code_challengeis generated andcode_verifieris stored - Use the
-
Construct the Login URL:
- Include the
response_type,state,code_challenge, and other required OAuth parameters.
- Include the
-
Redirect the User:
- Send the user to Cognito's hosted UI with the constructed login URL.
-
Sample Login URL:
https://your-cognito-domain.auth.region.amazoncognito.com/login
?response_type=code
&client_id=your-client-id
&redirect_uri=http://localhost:8080/callback
&state=random-generated-state
&scope=openid
&code_challenge=hashed-code-challenge
&code_challenge_method=S256
Code Implementation: LoginServlet
@WebServlet("/login")
public class LoginServlet extends HttpServlet {
    @Override
    protected void doGet(HttpServletRequest request, HttpServletResponse response)
            throws ServletException, IOException {
        // Step 1: Generate PKCE code challenge and store code verifier
        String codeChallenge = CognitoConfig.getCodeChallenge(request);

        // Step 2: Construct the login URL
        String loginUrl = String.format(
                "https://%s/login?redirect_uri=%s&response_type=code&client_id=%s&state=%s&scope=openid&code_challenge=%s&code_challenge_method=S256",
                CognitoConfig.DOMAIN,
                CognitoConfig.getEncodedRedirectUri(),
                CognitoConfig.CLIENT_ID,
                CognitoConfig.getState(),
                codeChallenge
        );

        // Step 3: Redirect the user to Cognito's hosted UI
        response.sendRedirect(loginUrl);
    }
}
2. Generating the PKCE Code Challenge
The PKCE process ensures secure communication during the OAuth flow. It involves generating a code_verifier (random string) and a code_challenge (hashed version of the code_verifier).
Key Steps:
-
Generate a Random
code_verifier:- Use the
PKCEUtil.generateCodeVerifier()method to create a secure random string.
- Use the
-
Hash the
code_verifierto Create thecode_challenge:- Use SHA-256 to hash the
code_verifierand Base64 URL-encode the result.
- Use SHA-256 to hash the
-
Store the
code_verifier:- Save the
code_verifierin the user's session for later use during token exchange.
- Save the
Code Implementation: PKCEUtil
public static String generateCodeVerifier() {
    byte[] code = new byte[64];
    new SecureRandom().nextBytes(code);
    return Base64.getUrlEncoder().withoutPadding().encodeToString(code);
}

public static String generateCodeChallenge(String codeVerifier) throws Exception {
    MessageDigest digest = MessageDigest.getInstance("SHA-256");
    byte[] hash = digest.digest(codeVerifier.getBytes("US-ASCII"));
    return Base64.getUrlEncoder().withoutPadding().encodeToString(hash);
}
Storing the Code Verifier
The CognitoConfig class ensures the code_verifier is securely stored in the user's session:
private static final String CODE_VERIFIER_SESSION_ATTRIBUTE = "code_verifier";

public static String getCodeChallenge(HttpServletRequest request) throws Exception {
    String codeVerifier = PKCEUtil.generateCodeVerifier();
    storeCodeVerifier(request, codeVerifier);
    return PKCEUtil.generateCodeChallenge(codeVerifier);
}

private static void storeCodeVerifier(HttpServletRequest request, String codeVerifier) {
    request.getSession().setAttribute(CODE_VERIFIER_SESSION_ATTRIBUTE, codeVerifier);
}
3. Handling the Callback
After the user logs in, Cognito redirects them back to your application with an authorization_code.
Key Steps:
-
Extract the Authorization Code:
- Retrieve the
codeandstatefrom the request parameters.
- Retrieve the
-
Exchange the Code for Tokens:
- Send a POST request to the Cognito token endpoint with the
code,code_verifier, and other required parameters.
- Send a POST request to the Cognito token endpoint with the
-
Store Tokens and User Info:
- Decode the ID token to extract user claims (e.g., username, email) and save them in the session.
Code Implementation: CallBackServlet
@WebServlet("/callback")
public class CallBackServlet extends HttpServlet {
    @Override
    protected void doGet(HttpServletRequest request, HttpServletResponse response)
            throws ServletException, IOException {
        String code = request.getParameter("code");
        if (code != null) {
            Map<String, String> tokens = AuthService.exchangeCodeForTokens(
                request, CognitoConfig.getTokenEndpoint(), CognitoConfig.CLIENT_ID, code);

            String idToken = tokens.get("id_token");
            DecodedJWT jwt = AuthService.parseIdToken(idToken);

            HttpSession session = request.getSession(true);
            session.setAttribute("idToken", idToken);
            session.setAttribute("username", jwt.getClaim("custom:idp_username").asString());

            response.sendRedirect(CognitoConfig.getSuccessRedirectForward());
        } else {
            response.sendRedirect("/login");
        }
    }
}
4. Token Exchange and Parsing
The AuthService class handles the token exchange and JWT parsing.
Key Steps:
-
Send a POST Request to the Token Endpoint:
- Include the
authorization_code,code_verifier, and other parameters.
- Include the
-
Parse the Response:
- Decode the ID token using the
auth0library.
- Decode the ID token using the
-
Return Type and Example Response:
- The method returns a
Map<String, String>containing tokens (ID token, access token, refresh token).
- The method returns a
Code Implementation: AuthService
public static Map<String, String> exchangeCodeForTokens(HttpServletRequest request, String tokenEndpoint, String clientId, String code) throws IOException {
    try (CloseableHttpClient client = HttpClients.createDefault()) {
        HttpPost post = new HttpPost(tokenEndpoint);
        post.setHeader("Content-Type", "application/x-www-form-urlencoded");

        String codeVerifier = CognitoConfig.retrieveCodeVerifier(request);
        Map<String, String> params = new HashMap<>();
        params.put("grant_type", "authorization_code");
        params.put("client_id", clientId);
        params.put("code", code);
        params.put("redirect_uri", CognitoConfig.REDIRECT_URI);
        params.put("code_verifier", codeVerifier);

        post.setEntity(new StringEntity(params.entrySet().stream()
                .map(e -> e.getKey() + "=" + e.getValue())
                .collect(Collectors.joining("&"))));

        try (CloseableHttpResponse response = client.execute(post)) {
            String responseBody = EntityUtils.toString(response.getEntity());
            return new ObjectMapper().readValue(responseBody, Map.class);
        }
    }
}
Sample Response from Cognito
{
  "id_token": "eyJraWQiOiJLTUt3Vz...",
  "access_token": "eyJraWQiOi...",
  "refresh_token": "def50200...",
  "expires_in": 3600,
  "token_type": "Bearer"
}
5. Managing Tokens and Sessions
Once tokens are obtained from the Cognito token endpoint, managing them properly ensures a smooth and secure user authentication experience. This includes verifying token validity, refreshing tokens when needed, and securely storing tokens.
Key Responsibilities of Token Management:
- Verify Token Validity:
- Check whether the ID token is expired before proceeding with user actions.
- Refresh Expired Tokens:
- Use the refresh token to obtain new tokens when the ID token has expired.
- Securely Store Tokens:
- Store tokens in server-side sessions to prevent exposure.
Code Implementation: AuthenticationFilter
The AuthenticationFilter is a Java servlet filter that ensures all incoming requests are authenticated. It checks the validity of the ID token, refreshes it if necessary, and redirects unauthenticated users to the login page.
@Override
public void doFilter(ServletRequest req, ServletResponse res, FilterChain chain)
        throws IOException, ServletException {
    HttpServletRequest request = (HttpServletRequest) req;
    HttpServletResponse response = (HttpServletResponse) res;

    // Step 1: Retrieve the current session
    HttpSession session = request.getSession(false);
    boolean loggedIn = session != null && session.getAttribute("username") != null;

    if (loggedIn) {
        // Step 2: Get the ID token from the session
        String idToken = (String) session.getAttribute("idToken");
        DecodedJWT jwt = JWT.decode(idToken);

        // Step 3: Check if the token is expired
        if (jwt.getExpiresAt().before(new Date())) {
            String refreshToken = (String) session.getAttribute("refreshToken");

            // Step 4: Refresh the tokens
            Map<String, String> newTokens = AuthService.refreshTokens(
                    String.format("https://%s/oauth2/token", CognitoConfig.getDomain()),
                    CognitoConfig.getClientId(),
                    refreshToken
            );

            // Step 5: Update the session with new tokens
            session.setAttribute("idToken", newTokens.get("id_token"));
            session.setAttribute("refreshToken", newTokens.get("refresh_token"));
        }

        // Allow the request to proceed
        chain.doFilter(req, res);
    } else {
        // Redirect to login if not logged in
        response.sendRedirect(request.getContextPath() + "/login");
    }
}
Explanation:
- Token Validation:
- Decodes the ID token using the
auth0library and checks its expiration (expclaim).
- Decodes the ID token using the
- Refreshing Tokens:
- If the ID token is expired, the
AuthService.refreshTokensmethod is called to obtain a fresh set of tokens.
- If the ID token is expired, the
- Session Management:
- Updates the session with the new tokens, ensuring the user remains authenticated.
6. Logging Out
Logging out involves invalidating the user's session and optionally redirecting them to the Cognito logout endpoint.
Why is this important?
Logging out ensures:
- Sensitive information, including tokens, is cleared from the session.
- The user is redirected to a safe location (e.g., home page or login page).
Key Steps:
- Invalidate the Session:
- Use the
HttpSession.invalidate()method to clear all session attributes.
- Use the
- Redirect to Cognito's Logout Endpoint (Optional):
- Redirect the user to Cognito's logout URL to fully log them out of all Cognito-managed sessions.
Code Implementation: LogoutServlet
@WebServlet("/logout")
public class LogoutServlet extends HttpServlet {
    @Override
    protected void doGet(HttpServletRequest request, HttpServletResponse response)
            throws ServletException, IOException {
        // Step 1: Invalidate the session
        HttpSession session = request.getSession(false);
        if (session != null) {
            session.invalidate();
        }

        // Step 2: Redirect to home page or Cognito logout endpoint
        String logoutUrl = String.format(
                "https://%s/logout?client_id=%s&logout_uri=%s",
                CognitoConfig.DOMAIN,
                CognitoConfig.CLIENT_ID,
                "http://localhost:8080/"
        );
        response.sendRedirect(logoutUrl);
    }
}
Example Cognito Logout URL:
https://your-cognito-domain.auth.region.amazoncognito.com/logout
?client_id=your-client-id
&logout_uri=http://localhost:8080/
Best Practices
To ensure a secure and reliable implementation, follow these best practices:
- Use HTTPS:
- Always use HTTPS to encrypt data in transit, especially tokens.
- Store Tokens Securely:
- Use server-side sessions to store tokens. Avoid storing sensitive tokens (e.g., ID or refresh tokens) in client-side cookies or local storage.
- Graceful Token Refresh:
- Implement token refresh logic to handle token expiration seamlessly without requiring the user to log in again.
- Validate
stateParameter:- Always validate the
stateparameter during the callback to prevent CSRF attacks.
- Always validate the
- Handle Token Revocation:
- If a user revokes a token, handle the scenario gracefully by redirecting them to the login page.
Common Pitfalls and Debugging
-
Missing
code_verifierDuring Token Exchange:- Ensure the
code_verifieris stored in the session during the login flow. - Retrieve it from the session during the token exchange.
- Ensure the
-
Token Expiration:
- Always check the
expclaim in the ID token to determine its validity. - Use the refresh token to obtain new tokens when the ID token has expired.
- Always check the
-
Mismatched Redirect URI:
- Ensure the redirect URI configured in Cognito matches the one used in your application. Mismatched URIs will result in authentication failures.
-
Invalid State Parameter:
- If the
stateparameter is missing or mismatched during the callback, reject the request to prevent potential CSRF attacks.
- If the
Debugging Tips:
- Log all incoming requests and their parameters during the callback to debug issues.
- Use tools like Postman to test the token exchange process.
- Enable detailed logging in your application during development to trace token-related issues.
Conclusion
This guide provides a comprehensive walkthrough of integrating AWS Cognito with a Java-based application. By following these steps, you can implement a secure and scalable authentication solution using industry-standard practices.
Summary of Key Features:
- Secure Authentication:
- Leverages OAuth 2.0 Authorization Code Flow with PKCE for secure token exchange.
- Session Management:
- Uses server-side sessions to store and manage tokens securely.
- Token Refresh:
- Implements seamless token refresh logic for uninterrupted user sessions.
- Logout Handling:
- Ensures proper session invalidation and optional Cognito logout.
By implementing these features and best practices, you'll provide a robust authentication solution for your application.